The Fragile Soul of Old Clay
I’ve spent forty years listening to the songs of different walls. A 19th-century common brick has a hollow, earthy thud when you rap it with your knuckles, while a modern hard-fired utility brick pings like a piece of structural steel. Most folks look at a dirty, soot-stained facade and see a candidate for a high-pressure wash. I see a patient in need of a delicate touch. You don’t just ‘scrub’ a historic wall; you negotiate with it. If you go in with a heavy hand, you’ll strip the ‘fire-skin’—that vitrified outer layer created in the kiln—and once that’s gone, the brick is effectively a sponge waiting to be destroyed by the first frost.
The Lesson of the Soft Brick
My old mentor once handed me a piece of orange-red clay that had been pulled from a chimney stack in a maritime district. He told me to soak it in a bucket of water for ten minutes. When I pulled it out, the brick had gained nearly twenty percent in weight. ‘That’s suction,’ he grumbled. ‘If you put a hard Portland cement against that, or hit it with a wire brush, you’re killing it.’ He was right. Most modern failures in masonry water damage repair happen because someone treated an old, soft substrate like a modern retaining wall block replacement project. You cannot use brute force on a material that breathes. I’ve seen stone balustrade restoration jobs where the fine detail was obliterated because a ‘restoration expert’ didn’t understand that the grime was actually providing a protective patina that required chemical softening, not mechanical abrasion.
“The use of high-pressure water (over 300 to 500 psi) can easily damage the surface of historic brick, particularly those fired at lower temperatures.” – BIA Technical Note 20
The Physics of the Fire-Skin
Let’s talk about the chemistry of a ‘lobotomized’ brick. When clay is fired in a kiln, the minerals on the surface fuse into a dense, protective crust. This is the brick’s only defense against the elements. Beneath that crust lies the ‘heart’ of the brick, which is much softer and more porous. When a DIYer picks up a tuckpointing tools for DIY kit and decides to grind out joints or scrub the faces with a steel-bristled brush, they often bypass the skin and expose the heart. This leads to spalling. In a climate where the freeze-thaw cycle is a constant threat, water gets into those exposed pores, expands by 9% as it turns to ice, and literally pops the face of the brick off in a sheet. This isn’t just an aesthetic issue; it’s a structural death sentence. I’ve spent weeks on cracked brick wall repair where the root cause was simply a cleaning job gone wrong ten years prior.
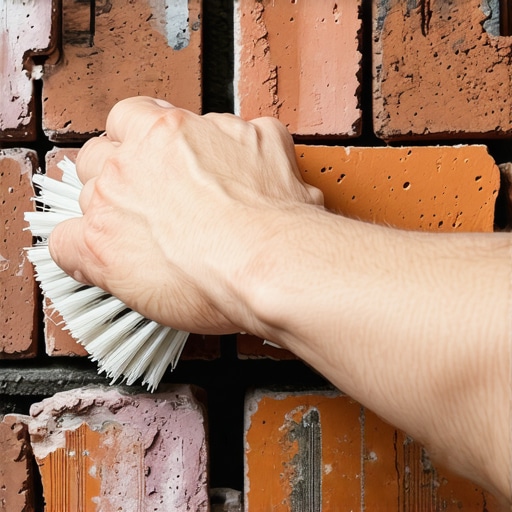
The Cleaning Protocol: Softness as a Strength
The first step in cleaning is saturation. You never apply a cleaning agent to a dry brick. If the brick is dry, it will suck the chemical deep into its core, where it will crystalize and cause internal pressure. You drench the wall with a garden hose until the brick can’t hold another drop—until the ‘suction’ is neutralized. Only then do you apply a mild, non-ionic detergent. Use a natural or nylon bristle brush. If you find yourself leaning into the scrub, you’re doing it wrong. The ‘mud’—our term for mortar and debris—should be lifted by the chemical action, not the friction. While modern self-healing concrete foundations are designed to handle internal stress through chemical additives, old masonry relies on its physical integrity. If you have deep staining, you might move to a mild acidic wash, but never muriatic acid. It leaves behind chlorides that bloom as white efflorescence for decades.
The Role of Drainage and Coping
Cleaning the face is useless if the wall is being drowned from the inside. This is why I always check the stone coping installation at the top of a wall first. If the coping is cracked or lacks a proper drip edge, water is running down the back of the masonry, pushing salts to the surface. Similarly, on garden walls, I often find myself doing retaining wall weep hole cleaning before I even touch a brush. If those weep holes are clogged with mud and roots, hydrostatic pressure is forcing moisture through the brick face, carrying minerals that create the very stains you’re trying to clean. It’s a fool’s errand to scrub a wall that hasn’t been properly drained.
“Water penetration is the single greatest threat to masonry durability.” – ASTM C1080 Standards
Mortar Selection and the Sacrificial Principle
Once the brick is clean, you’ll likely see the real damage. This is where historic pointing styles come into play. You don’t just slap a Type S mortar into an old wall. Modern mortars are often too hard and contain fiber-reinforced mortars that are great for a highway bridge but will crush an old brick as the wall expands and contracts with the sun. You need a sacrificial mortar—usually a high-lime mix (Type O or even a pure lime putty). The mortar must be the weakest link. If the wall moves, you want the mortar to crack, not the brick. Cracks in mortar are easy to fix; shattered bricks require a full-scale cracked brick wall repair or even a retaining wall block replacement if the stability is compromised. When you’re buttering your joints, use a small slicker to compress the mud. That compression is what keeps the water out, not the hardness of the material. A well-struck grapevine or weathered joint will shed water for a century, whereas a flat, uncompressed joint is just an invitation for rot. Respect the trade, respect the clay, and for heaven’s sake, put the pressure washer back in the truck.”