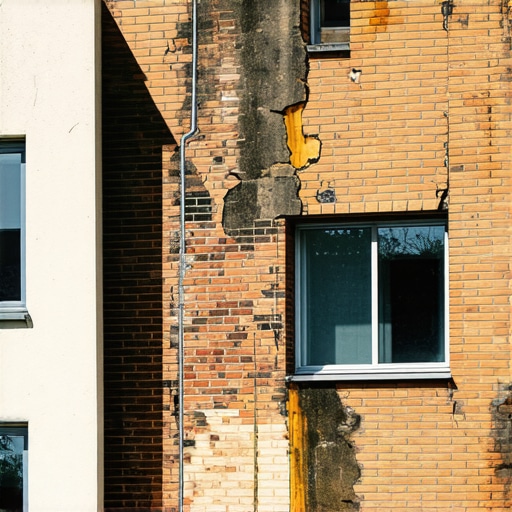
The Hidden Danger of Trapped Water Behind Commercial Brick Veneers
The facility manager called me because he saw what he termed ‘a little white dust’ on a six-story commercial facade. He thought it was a cleaning issue. I climbed the scaffolding, pulled my fiber-optic scope from my kit, and threaded it through a hairline crack in the mortar joint. What I saw on the monitor wasn’t just dust; it was a forensic crime scene. The structural steel anchors, meant to hold the brick veneer to the backup wall, were rusted to thin, orange wafers. The OSB sheathing behind the air gap had the consistency of wet oatmeal. The homeowner or building owner thinks a brick wall is a solid, impermeable fortress. It isn’t. It’s a reservoir. If you don’t understand the physics of the drainage plane, you aren’t a mason; you’re just a guy stacking heavy rocks.
Commercial brick veneer installation is a dance of moisture management. Unlike old-world mass masonry where three-foot-thick walls absorbed and released water through sheer bulk, a veneer is a thin skin. It relies entirely on the ‘cavity’—that one-to-two-inch space between the brick and the house wrap. When water hits that brick, it doesn’t just bounce off. Due to capillary action, the moisture travels through the microscopic pores of the brick and the mortar. This is where the chemistry of ‘suction’ comes into play. If the brick was laid ‘dry’ without being pre-wetted, it sucked the hydration out of the mud (mortar) too fast, creating a weak bond that invites water to pour through the bed joints.
“Water penetration is the single greatest threat to masonry durability. Proper flashing and weep hole systems are the only defense against the inevitable saturation of the veneer.” – BIA Technical Note 7
In the North, where the freeze-thaw cycle is a relentless hammer, trapped water is a death sentence. Water expands 9% when it turns to ice. If that moisture is trapped behind a hard, Portland-heavy mortar, it creates internal hydraulic pressure. This results in spalling, where the beautiful face of the brick literally pops off, leaving a crumbly, orange mess behind. We see this often in chimney rebuild services. A chimney is exposed on all four sides to the elements. If the crown is cracked or the retaining wall capstone replacement was handled by a handyman using ‘lick-and-stick’ methods, the water enters and has nowhere to go. It sits on the lintels, it rots the chimney structural repair efforts, and it eventually leads to a total collapse of the brick column repair zones.
The Physics of the Cavity: Why Your Weep Holes Are Failing
The most common failure I see in brick wall restoration is the ‘clogged cavity.’ Inexperienced crews often let excess mortar fall behind the wall as they butter the bricks. These ‘mortar droppings’ accumulate at the base of the wall, sitting right on the flashing. They act as a bridge, wicking water away from the drainage plane and straight into the wooden studs or the steel track. This leads to foundation crack repair needs that are actually caused by top-down moisture infiltration rather than soil movement. You can have the best retaining wall geogrid installation in the world, but if the hydrostatic pressure isn’t relieved by clear drainage, that wall is going to bow.
Micro-zooming into the mortar chemistry, we have to talk about the carbonation process. In historic brick wall restoration, using a modern Type S mortar on old, soft bricks is a sin. Type S is too hard; it lacks the ‘autogenous healing’ properties of high-lime mortars. When a lime-rich mortar develops a hairline crack, water dissolves a bit of the free lime and redeposits it in the crack as it evaporates—literally healing itself. Modern ‘hot’ mixes don’t do that. They crack, they stay cracked, and they let the water in. This is why 3D printed masonry repairs are still in their infancy; we haven’t quite mastered the material science to mimic the breathability of traditional masonry units.
“Mortar should always be weaker than the masonry units it binds, acting as a sacrificial element that allows for thermal expansion and moisture migration.” – ASTM C270 Standards
When we look at retaining wall block replacement, the issue is often the base. People think 4 inches of gravel is enough. It isn’t. You need compaction physics. You need to understand the ‘angle of repose’ for the soil behind the wall. Without a proper retaining wall geogrid installation, the weight of the saturated soil pushes the blocks outward. You’ll see the soldier course start to lean, then the retaining wall capstone replacement fails, and suddenly you have $40,000 worth of stone in your driveway. I’ve seen brick column repair jobs where the internal rebar wasn’t grouted properly; the ‘honeycombing’ in the concrete allowed oxygen and water to reach the steel, causing ‘rust jacking’ that split the column from the inside out.
The Forensic Solution: Restoring the Breathability
True restoration isn’t about slapping some caulk in a crack. It’s about tuckpointing vs. repointing. It’s about using a slicker to compress the joint, creating a ‘skin’ that sheds water while allowing the mud to breathe. If you’re dealing with a chimney structural repair, you need to ensure the lead flashing is stepped correctly into the mortar joints. If you’re doing a brick veneer installation today, you must use rain-screen technology. We aren’t just stacking bricks; we are building a complex hydraulic management system. I’ve spent my life following the ‘Old Masters,’ and they knew one thing: you don’t fight water. You give it a clear, directed path to leave your building. Anything else is just a slow-motion demolition. Whether it’s foundation crack repair or chimney rebuild services, if the mason doesn’t talk about ‘vapor permeability’ and ‘hydrostatic relief,’ send him packing before he ruins your masonry heritage.