![Is Your Chimney Flue Flaking? 3 Interior Parging Fixes [2026]](https://masonryrescue.com/wp-content/uploads/2026/03/Is-Your-Chimney-Flue-Flaking-3-Interior-Parging-Fixes-2026.jpeg)
Is Your Chimney Flue Flaking? 3 Interior Parging Fixes [2026]
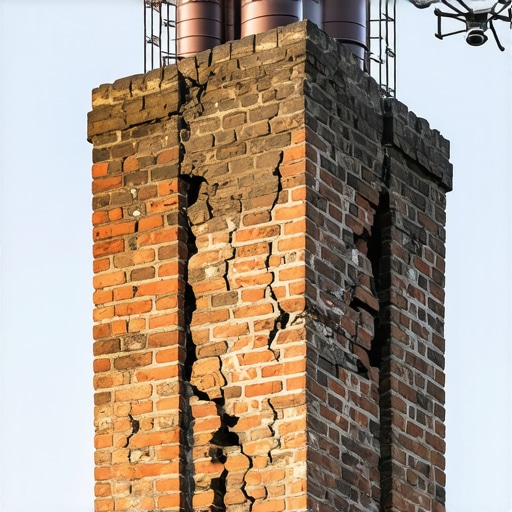
The Red Snow of the Hearth: Why Your Chimney Flue is Delaminating
I was standing in a basement in the middle of a damp November morning when the homeowner pointed to what she called ‘red dust’ at the bottom of her clean-out door. To the untrained eye, it looked like a bit of eroded brick. But when I ran my gloved finger through it, the texture wasn’t just sandy—it was sharp, crystalline, and smelled of sulfur. I knew exactly what I was looking at. I pulled out my 4K fiber-optic scope and threaded it up past the damper. What I saw on the screen looked like a cave system in a horror movie. The terra cotta flue tiles weren’t just cracked; they were ‘exfoliating’ in sheets as thick as a steak knife, hanging by a thread of soot. The homeowner thought it was a minor maintenance issue, but the structural integrity of the chimney’s ‘throat’ was essentially gone. One more high-heat fire and that ‘red snow’ would have been a structural collapse, potentially blocking the flue and sending carbon monoxide back into the living room.
This is the reality of chimney repair services in the modern age. We are seeing an epidemic of flue failure, largely because the physics of how we heat our homes has changed while the masonry remains trapped in the past. When you see those flakes, you aren’t just looking at old clay; you are looking at the result of a chemical war between moisture, combustion byproducts, and the masonry’s own porosity.
“The presence of moisture in the chimney flue, combined with the acidic byproducts of combustion, creates a corrosive environment that can rapidly degrade clay flue liners and mortar joints.” – NFPA 211: Standard for Chimneys, Fireplaces, Vents, and Solid Fuel-Burning Appliances
The Physics of the Flake: Why Clay ‘Spalls’
To understand the fix, you have to understand the ‘tooth’ of the material. A chimney flue is a high-stress environment. You are taking a material—clay or refractory mortar—and subjecting it to a 600-degree temperature swing in under twenty minutes. This is thermal shock. But the real killer is the ‘acid dew point.’ As smoke rises, it cools. If it hits a certain temperature before it exits the stack, the water vapor in that smoke condenses on the flue walls. This isn’t just water; it’s a soup of hydrochloric and sulfuric acids. These acids penetrate the ‘capillaries’ of the brick and tile, dissolving the calcium aluminates that hold the material together.
In northern climates where the freeze-thaw cycle is relentless, this moisture then freezes. Since water expands 9% when it turns to ice, it literally ‘pops’ the face of the tile off from the inside out. This is identical to the physics we see during spalled concrete steps repair, where the surface delaminates because the internal pressure exceeds the material’s tensile strength. If your flue is flaking, the ‘skin’ of your chimney is failing, and you’re losing the smooth surface required for proper draft. You’re no longer venting; you’re accumulating creosote in the crevices, turning your chimney into a tinderbox.
Fix 1: The Refractory Parging ‘Butter’ Method
When the structural tiles are still sound but the joints and surface have begun to ‘sand’ or show minor ‘honeycombing,’ we turn to parging. This isn’t your standard tile grouts on masonry application. We use a specialized refractory mortar—what we call ‘the mud’—that is rated to withstand 2,000+ degrees. [image_placeholder_1]
The process starts with a ‘mechanical scrub’ to remove all soot and loose vitrified clay. We then ‘butter’ the interior walls using a foam applicator system that is winched up the chimney. The key here is the ‘suction.’ If the old brick is too dry, it will suck the moisture out of the new parge coat instantly, causing it to ‘flash set’ and eventually flake off just like the old stuff. We pre-wet the flue to ensure a ‘saturated surface dry’ condition. This allows the new refractory material to knit into the ‘pores’ of the old clay, creating a monolithic seal. This is the same principle used in concrete flatwork services when we want a new pour to bond to an old slab—without the right ‘tooth,’ you’re just wasting material.
Fix 2: Advanced Masonry Adhesives & Joint Repair
Sometimes the tiles aren’t flaking, but the joints between them have vanished. Historically, these were laid with simple lime and sand, which the acidic condensate eats for breakfast. For this, we use advanced masonry adhesives that remain flexible. You might think ‘flexible’ is a bad word in masonry, but a chimney is a breathing, moving organism. It expands when hot and contracts when cold. If you use a mortar that is too ‘hard’ (high Portland cement content), it won’t give. Instead, it will crack the flue tiles themselves.
We use a ‘pumped’ joint system. Think of it like a surgical injection. We fill the voids between the tiles with a high-calcium aluminate paste. This creates a seal that is impervious to the ‘acid dew point’ while still allowing for thermal expansion. If you’re looking at a tuckpointing cost estimation for the exterior of your chimney, remember that the interior joints are ten times more critical for safety. A hole in an exterior joint is a cosmetic issue; a hole in a flue joint is a fire path to your 2×4 framing.
Fix 3: Cast-in-Place Liners and ‘Self-Leveling’ Lifts
In cases where the flaking has progressed to structural instability—where the ‘parging’ won’t hold because there is nothing left to bond to—we move to a cast-in-place solution. This is the ‘heavy artillery’ of chimney rebuild services. We drop a rubber bladder down the flue, inflate it, and then pour a lightweight, insulating masonry mix around it.
This isn’t unlike self-leveling masonry lifts used in floor restoration. The mix has to be fluid enough to fill every void and crack in the old masonry, but strong enough to stand on its own once the bladder is deflated. The result is a seamless, jointless tube of stone inside your old chimney. It reinforces the entire stack. I’ve seen chimneys with foundation wall bowing repair needs that were actually stabilized by a cast-in-place liner because it acted like a structural ‘spine’ for the failing brickwork.
“A masonry chimney shall be lined with low-duty refractory brick, shale tiles, or a cast-in-place liner to ensure the containment of heat and flue gases.” – ASTM C1283: Standard Practice for Installation of Masonry Chimneys
The ‘Slicker’s’ Final Word: Don’t Cheap Out
I’ve seen plenty of ‘handyman specials’ where someone tried to fix a flaking flue by throwing some hardware store furnace cement up there with a coat hanger. It never works. Within six months, the heat cycles ‘fry’ the bond, and the ‘mud’ ends up in a pile at the bottom of the smoke shelf. Chimney work is forensic work. You have to understand the ‘cold joint’—that weak point where new material meets old. If you don’t prep the ‘tooth’ of the stone, you’re just putting a Band-Aid on a compound fracture. Whether you’re dealing with a chimney sweep and repair professional or a master mason, ask them about the chemistry of their parge mix. If they can’t explain the difference between Type N mortar and a refractory blend, send them packing. Your house—and your lungs—depend on that draft being perfect.
{“@context”:”https://schema.org”,”@type”:”HowTo”,”name”:”How to Fix a Flaking Chimney Flue with Refractory Parging”,”step”:[{“@type”:”HowToStep”,”text”:”Conduct a 4K video inspection to identify the depth of the spalling and whether the clay tiles are structurally sound.”},{“@type”:”HowToStep”,”text”:”Mechanical cleaning using wire brushes and high-vacuum systems to remove all creosote, soot, and loose vitrified clay fragments.”},{“@type”:”HowToStep”,”text”:”Dampen the flue walls to achieve a Saturated Surface Dry (SSD) state, preventing the old masonry from ‘wicking’ the moisture out of the new parging.”},{“@type”:”HowToStep”,”text”:”Apply a high-calcium aluminate refractory mortar using a winched applicator tool, ensuring a minimum 1/4 inch thickness to seal all ‘honeycombing’ and gaps.”},{“@type”:”HowToStep”,”text”:”Allow a 24-48 hour cure time with the damper open for airflow before the first low-heat ‘seasoning’ fire.”}]}


Reading this detailed breakdown of chimney flaking issues really highlights how critical proper maintenance and material choice are in fireplace safety. I’ve personally dealt with similar problems in older homes where the original clay liners had started to exfoliate, especially after harsh winters. The explanation about the acid dew point and freeze-thaw cycles made a lot of sense—I had always wondered why some chimneys fail so suddenly despite minimal visible damage. The solutions offered, like refractory parging and cast-in-place liners, seem quite effective, but I’m curious about the typical lifespan of these repairs. Has anyone here had experience with how long a properly done cast-in-place liner lasts before needing repair or replacement? Also, given the importance of professional assessment, what questions should homeowners ask their chimney service providers to ensure they are using the right materials and techniques? It’s reassuring to see such tech-forward solutions addressing traditional problems, especially with climate conditions worsening.