The Forensic Scene: When Luxury Peels Like a Sunburn
I walked onto a high-profile commercial site last October where a developer had spent six figures on what was supposed to be a ‘liquid copper’ architectural finish over a massive brick column repair. Three months in, the metallic sheen was curling away from the substrate like dry skin, revealing the raw, gray masonry beneath. The foreman tried to blame the manufacturer, but the truth was written in the microscopic layer of dust between the finish and the brick. They had applied a high-tech metallic masonry finish over a surface that had zero ‘tooth’ and a pH level that would melt a lead pipe. This isn’t just a cosmetic failure; it is a structural insult. When we talk about metallic masonry finishes, we aren’t painting a fence; we are engaging in a complex chemical marriage between silicate-based mineral structures and metallic-oxide pigments. If you don’t understand the chemistry of the bond, you’re just throwing money at the wind.
“Surface preparation is the single most critical factor in the performance of any coating applied to masonry. The presence of moisture, efflorescence, or alkalinity will inevitably lead to adhesive failure.” – BIA Technical Note 6A
The Chemistry of the ‘Tooth’: Why Bonds Fail
To get a metallic finish to actually bite into the substrate, you have to understand the ‘suction’ of the masonry. Whether you are dealing with a brick arch restoration or a commercial smokestack repair, the substrate is a thirsty, porous animal. Most modern contractors treat masonry as if it’s inert plastic. It’s not. It’s a breathing, alkaline matrix of calcium silicate and alumina. When you apply a metallic finish, you aren’t just laying a film on top; you are trying to create a mechanical and ionic bond. To do this, the masonry must be in a ‘saturated surface dry’ (SSD) state. If the brick is too dry, it sucks the moisture out of the finish too fast—what we call ‘burning the mud’—and the metallic particles never align correctly. If it’s too wet, the hydrostatic pressure will push the finish off the wall before it even cures.
Micro-zooming into the interface: you need a profile. In the trade, we look for a surface texture similar to 80-grit sandpaper. This ‘tooth’ allows the metallic particles to lodge themselves into the pores of the brick. Without this, the surface tension of the metallic coating causes it to bead up and skin over, creating a cold joint at the molecular level. This is particularly dangerous in historic pointing styles where the mortar is much softer than the surrounding brick. If you use a hard, non-breathable metallic finish over a soft lime-based flush pointing service, you’ve just built a trap for moisture. When the temperature drops, that trapped water freezes, expands by 9%, and pops the entire metallic face off the building.
The Restoration Reality: Breathability and Physics
In historic brick restoration, we live by one rule: the mortar must be the sacrificial lamb. It has to be softer and more permeable than the brick. When we introduce metallic finishes into this equation, we often run into the ‘vapor barrier trap.’ Many cheap metallic coatings are essentially plastic skins. They seal the masonry. In a brick column repair on a building from the 1920s, sealing that brick is a death sentence. The moisture that naturally rises through the foundation via capillary action needs a way out. If it hits that metallic skin and can’t evaporate, it stays in the brick. In northern climates, the freeze-thaw cycle will turn that brick to powder inside of three winters.
We solve this by using sustainable masonry materials—specifically, mineral-based metallic stains rather than film-forming paints. These stains use potassium silicate as a binder. When applied, they undergo a process called ‘petrification.’ The silicate in the finish reacts with the calcium hydroxide in the masonry to form a crystalline structure that is literally part of the stone. It’s not a layer; it’s a molecular integration. This allows the wall to ‘breathe’ (vapor permeability) while still reflecting light like a burnished bronze sheet.
“Mortar should be designed to be weaker than the masonry units so that any stresses resulting in movement are accommodated in the mortar joints rather than the units themselves.” – ASTM C270 Standards
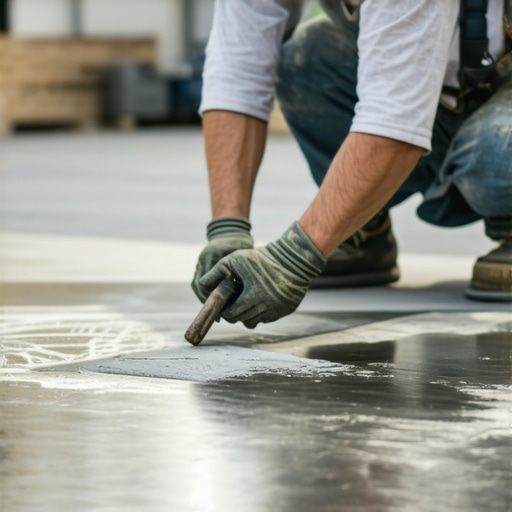
The Process: From ‘Butter’ to ‘Slicker’
To apply these finishes correctly, especially on complex geometries like brick arch restoration, the workflow is everything. First, we address the joints. If the joints are failing, we perform repointing using historic pointing styles that match the original composition. Once the mud is cured, we move to the metallic phase. I always start with a ‘slurry coat.’ This is a highly thinned version of the finish that I ‘butter’ onto the surface with a masonry brush, working it deep into the honeycombing of the brick. This acts as a primer, satisfying the initial suction of the masonry.
Next, we use a hawk and a slicker to manage the application of the main body. In commercial settings where we might be using self-leveling masonry lifts to reach commercial smokestacks, the consistency of the mix is vital. If the mix is too thin, the metallic oxides will settle to the bottom, leaving you with a patchy, dull finish. If it’s too thick, you’ll get ‘lapping’—visible lines where one stroke ended and another began. We apply it in a soldier course pattern for verticality, or in circular motions to mimic the natural oxidation of metal. The goal is to avoid any cold joints where the finish dries before the next section is joined.
Advanced Systems: Mortarless and Retaining Walls
Modern engineering has brought us mortarless masonry systems and retaining wall block replacement techniques that simplify the structural side but complicate the finishing side. For a retaining wall block replacement, the metallic finish must account for the high hydrostatic pressure from the soil behind it. You can’t just slap a metallic finish on a retaining wall without a drainage mat and proper aggregate backfill. If you do, the finish will be efflorescing white salt crystals within a month, ruining the metallic aesthetic. For these applications, we use a ‘negative side’ moisture barrier before the metallic finish to ensure the bond stays dry from the inside out.
Final Inspection: Do It Once, or Do It Twice
Cynicism in this trade comes from watching people take shortcuts. They see a ‘metallic finish’ and think it’s a weekend DIY project. It’s not. It’s a forensic exercise in material science. You have to respect the sustainable masonry materials you’re working with. You have to understand that a brick column repair is a different beast than a retaining wall. If you don’t account for the thermal expansion—especially in those long, sun-baked southern walls—the metallic finish will shear off as the masonry expands. Use control joints, choose the right silicate binder, and for heaven’s sake, make sure the surface is clean enough to eat off of before you even open a bucket of finish. If it doesn’t ‘ring’ right when you’ve finished, you haven’t bonded it; you’ve just hidden the problem under a shiny coat of lies. [{“@context”:”https://schema.org”,”@type”:”HowTo”,”name”:”How to Apply Metallic Masonry Finishes”,”step”:[{“@type”:”HowToStep”,”text”:”Clean the masonry substrate using a low-pressure wash and a pH-neutral cleaner to remove all efflorescence and atmospheric pollutants.”},{“@type”:”HowToStep”,”text”:”Assess the ‘tooth’ of the masonry. If the surface is too smooth, use a light abrasive blast to achieve an 80-grit texture profile.”},{“@type”:”HowToStep”,”text”:”Repair all failing joints using historic pointing styles and appropriate mortar types to ensure structural integrity before finishing.”},{“@type”:”HowToStep”,”text”:”Apply a silicate-based metallic primer coat to satisfy the suction of the masonry and create a chemical bridge for the final finish.”},{“@type”:”HowToStep”,”text”:”Apply the final metallic finish using a brush or hawk, maintaining a wet edge to avoid cold joints and ensuring even distribution of metallic oxides.”}]}]