I stood looking at a $50,000 retaining wall that lay in a pile of rubble because the contractor forgot one thing: drainage. It was a crisp October morning when the call came in. The homeowner was frantic, claiming their ‘indestructible’ stone wall had simply folded over during a light rain. When I arrived, the scene was a forensic textbook of failure. The massive blocks, once meticulously stacked, were scattered like a toddler’s toys. The culprit wasn’t the stone, and it wasn’t the mud—the mortar—holding the caps. It was the invisible physics of hydrostatic pressure. As a third-generation mason, I’ve seen this tragedy play out from the frost-heaved hills of New England to the sun-baked clays of the South. If your wall is starting to belly out, you aren’t just looking at a cosmetic flaw; you are looking at a structural ticking time bomb.
“Water penetration is the single greatest threat to masonry durability. Without proper management of moisture, even the strongest wall will eventually succumb to internal pressures.” – BIA Technical Note 7
The Physics of the Bulge: Why Walls Fail
To understand why your wall is bowing, you have to understand the ‘tooth’ of the soil and the sheer weight of water. Soil is heavy, but saturated soil is a monster. When rain falls, it fills the voids between soil particles. In geotechnical terms, this is the transition from a stable mass to a fluid state. This fluid exerts hydrostatic pressure against the back of your masonry. In northern climates, this is exacerbated by the freeze-thaw cycle. Water expands 9% when it turns to ice. If that water is trapped behind your bricks, it doesn’t just push the wall forward; it triggers brick spalling by forcing moisture into the pores of the unit until the face literally pops off. This is why brick spalling prevention starts long before the first course is laid.
1. The Weep Hole: Your Wall’s Safety Valve
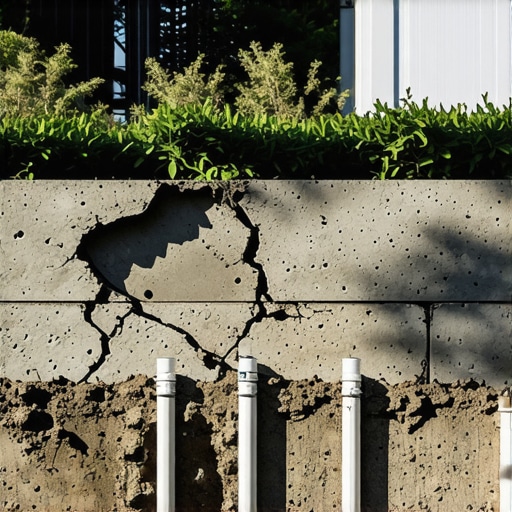
The first point of failure I look for in any bulging wall is the weep hole. These are the small gaps left in the vertical joints, or sometimes pipes inserted into the base of the wall, designed to let water escape. If you don’t see them, or if they are clogged with mud and debris, your wall is essentially a dam. Without an exit, water builds up until the pressure exceeds the structural capacity of the masonry. I’ve seen DIYers use tuckpointing tools for DIY projects to ‘clean up’ a wall, only to accidentally plug the very holes that keep the wall standing. If your weep holes are dry after a storm but the wall is weeping through the mortar joints, you have a major internal blockage. You might need structural repointing to restore the integrity of the face while you address the lack of an internal drainage path.
2. The Drainage Aggregate: The Invisible Filter
Behind every successful retaining wall is a column of clean, angular stone. We call this the drainage chimney. Its job is to provide a path of least resistance for water to drop straight down to the base of the wall. When I see a wall bulging, it’s often because a ‘budget’ contractor skipped the stone and backfilled with native soil. This soil eventually clogs the ‘tooth’ of the masonry and holds moisture directly against the structure. This saturation leads to crumbling mortar joint repair needs as the constant moisture leaches the lime out of the mix, leaving behind a sandy, brittle mess. You need at least 12 inches of clean gravel wrapped in filter fabric to prevent ‘fines’ from the soil from migrating into the stone and creating a concrete-like plug. Without this filter, the wall is doomed from day one.
3. The Cap and the Surface Swale: Keeping the Water Out
Prevention is always cheaper than a forensic structural repair. The top of your wall, whether it’s finished with a soldier course or heavy stone caps, must be shed-ready. This brings us to the chimney crown repair analogy—just as a chimney needs a concrete wash to shed water away from the flues, a retaining wall needs a slope or a swale behind it to direct surface runoff away from the backfill. If water is allowed to pool behind the wall, it saturates the soil faster than any drainage system can handle. During my inspections, I often find that chimney leak detection techniques are applicable here; I use moisture meters to see where the water is penetrating the most. Often, it’s at the top where the mortar has failed, allowing water to ‘butter’ its way down through the core of the wall.
“Retaining walls must be designed to resist lateral earth pressure and any additional pressure caused by surcharge loads or water.” – ASTM C1552 Standards
The Restoration Reality: Salvage or Start Over?
When the damage is done, the question is always: can we save it? If the wall has moved more than an inch or two out of plumb, you aren’t just looking at masonry cleaning or a simple ‘lick-and-stick’ fix. You are looking at a total failure of the internal reinforcement. However, if the bulge is caught early, we can sometimes implement ‘The Cure.’ This involves excavating the backfill, installing a proper drainage pipe (the ‘toe drain’), and replacing the soil with clean aggregate. During this process, I often look for historic brick salvage opportunities if the original material is high-quality but the installation was poor. For chimneys, this is the equivalent of a chimney damper repair combined with a full structural repointing—you fix the mechanism and the skin at the same time.
The Tools of the Trade
If you’re attempting a repair, don’t reach for a bag of cheap Portland cement from the big-box store. For older walls, you need a mud that breathes. Using a high-strength Type S mortar on soft, historic brick is a death sentence; the mortar will be harder than the brick, and when the wall moves (and it will), the brick will break instead of the joint. I always recommend using a slicker to strike the joints deeply, ensuring a tight seal that redirects water. Whether you’re dealing with chimney structural repair or a garden wall, the principles are the same: respect the water, manage the pressure, and never trust a wall without a way to breathe.