The Forensic Scene: When Good Intentions Kill Great Walls
The homeowner thought it was just a hairline crack, a minor blemish on a 1920s Tudor facade. But when I put my borescope inside the cavity, I didn’t see structural integrity; I saw a graveyard. The structural steel lintels were rusted to red dust, and the back-up wythe of common brick was turning into a soft, orange paste. The culprit? A ‘high-performance’ acrylic sealer applied five years prior. It had promised to keep the water out, but all it did was trap the moisture in, creating a slow-motion pressure cooker that was literally liquefying the building from the inside out. This is the reality of forensic masonry: most ‘solutions’ sold at big-box stores are death sentences for historic clay. To waterproof old brickwork without changing its color or destroying its soul, you have to stop thinking like a painter and start thinking like a physicist.
The Anatomy of the Pore: Why Old Brick Must Breathe
Old-world brick is a living, breathing skin. Unlike the dense, extruded ‘lick-and-stick’ veneer of modern subdivisions, historic brick was fired at lower temperatures in wood or coal kilns. This resulted in a material with high capillary suction. When it rains, these bricks drink. That’s not a defect; it’s a design feature. The wall acts as a reservoir, holding moisture and then releasing it through evaporation when the sun comes out. This is known as ‘vapor permeability.’ If you slap a film-forming sealer on that surface—something that creates a plastic-like membrane—you’ve essentially wrapped your house in a Ziploc bag. The liquid water still finds its way in through tuckpointing brick walls that have micro-fissures or through the soldier course at the top of a window, but it can never get out. When the first freeze hits, that trapped water expands by 9%, and the face of your brick pops off in a process we call spalling. To preserve the aesthetic and structural health, you need a sub-surface penetrant, not a topical coating.
“Water penetration is the single greatest threat to masonry durability, yet the application of non-breathable coatings often accelerates deterioration by trapping moisture within the substrate.” – BIA Technical Note 7
The Chemistry of Invisible Protection: Silanes and Siloxanes
If you want to keep the ‘tooth’ of the stone and the original matte finish of the clay, you use silanes or siloxanes. These aren’t paints; they are molecular-sized penetrants. A silane molecule is smaller than a siloxane, allowing it to dive deep into the brick arch restoration project you just finished, reacting chemically with the silica in the masonry to create a hydrophobic barrier. It doesn’t plug the pores; it lines them. Imagine a porous tube lined with microscopic hairs that push water away while still letting air molecules pass through. That is the ‘breathability’ we demand in the trade. When I’m buttering a joint or tuckpointing brick walls, I ensure the mud is fully cured before even thinking about these penetrants. Applying a sealer to ‘green’ mortar creates a cold joint in the chemical bond, leading to white, cloudy patches that look like honeycombing in concrete. You want a 100% breathable, penetrant-grade siloxane that offers no sheen, no darkening, and no ‘wet look’—just pure, invisible physics.
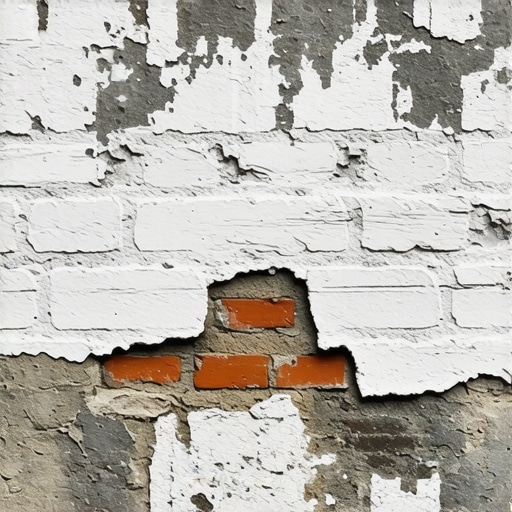
Step-by-Step Restoration: Preparation is 90% of the Battle
You cannot waterproof a dirty wall. If you seal over salts, you’re just locking in the cancer. The first step is brick efflorescence removal. Those white, powdery stains are mineral salts migrating to the surface. I use a mild, buffered phosphoric acid solution or a proprietary efflorescence remover, scrubbing with a stiff natural bristle brush. Never use a wire brush; you’ll leave metal fragments that will rust and ruin the face. Once the salts are gone, we look at the joints. If the mortar is crumbly, you’re tuckpointing. You need to rake out the old joints to a depth of at least 3/4-inch and butter in new mud. But here is the secret: you must use a mortar softer than the brick. For pre-1940s work, that means a Type O or even a pure lime putty. If you use modern Portland cement (Type S or M), the brick will break before the mortar does. After the tuckpointing is finished and I’ve hit it with the slicker to create a weather-struck joint, we let it sit for 28 days. Only then do we apply the waterproofing.
“Mortar should be sacrificial to the masonry unit; it must be more permeable and have a lower compressive strength than the brick it surrounds.” – ASTM C270 Standard
Hardscapes and High-Stress Zones: Patios and Fountains
Waterproofing isn’t just for vertical walls. For a brick patio restoration, the physics change. You’re dealing with hydrostatic pressure from the ground up. This is where masonry joint sand repair becomes critical. If you use standard play sand, it washes out, water sits under the pavers, and the whole thing heaves. I use a high-performance polymeric sand or a stabilized stone dust, ensuring the sustainable block cutting techniques used to fit the edges don’t leave jagged gaps. For an outdoor masonry fountain restoration, the waterproofing must be even more aggressive. You need a crystalline waterproofing agent that grows into the concrete substrate to block water under pressure, followed by a breathable siloxane on the decorative exterior brick. If you’re dealing with retaining wall batter correction, you must understand that no sealer in the world will save a wall with bad drainage. You need a perforated pipe and a gravel chimney behind that wall to relieve the pressure, or the ‘batter’ (the backward lean of the wall) will eventually become a forward lean into the mud.
Chimneys and Arches: The Vertical Challenge
Chimneys are the most abused masonry on any structure. They take the full brunt of the wind, rain, and thermal shock. A chimney heat shield installation is often necessary for the internal flue, but the exterior brickwork needs that same breathable siloxane we discussed. I’ve seen brick arch restoration jobs where the ‘keystone’—the center brick that holds the arch’s tension—literally crumbled because someone used a non-breathable sealer that caused the brick to ‘cook’ in the summer sun. When I’m on a hawk and trowel, repairing an arch, I’m looking at the concrete patch work of previous ‘handymen’ and grinding it out. Sustainable practices mean saving as much of the original unit as possible. Use sustainable block cutting to create Dutchmen patches for blown-out bricks rather than replacing the whole facade with modern garbage that won’t match the color or the expansion coefficient of the original wall.
The Final Inspection: Testing Your Work
Once you’ve applied your siloxane sealer—typically via a low-pressure spray starting from the bottom and working up to a ‘run down’ of about 6 inches—you wait. After 24 hours, perform the ‘droplet test.’ Flick some water onto the brick. It should bead up like a waxed car. But more importantly, the brick should look exactly as it did before you started. No shine, no darkening. You’ve successfully engineered a forensic-level barrier. You’ve protected the brick arch restoration, secured the retaining wall batter, and ensured the tuckpointing brick walls will last another century. Don’t fall for the ‘lick-and-stick’ marketing. Stick to the chemistry of the old masters, respect the pore, and never, ever wrap a historic building in plastic. Masonry isn’t just about what you see; it’s about how the water moves through what you can’t see. Do it once, do it right, or don’t do it at all. The building will thank you for its life, and your mud will stay where you put it. This is the difference between a handyman and a mason who knows the forensic truth of the stone.