The Chemistry of a Crumbling Crown
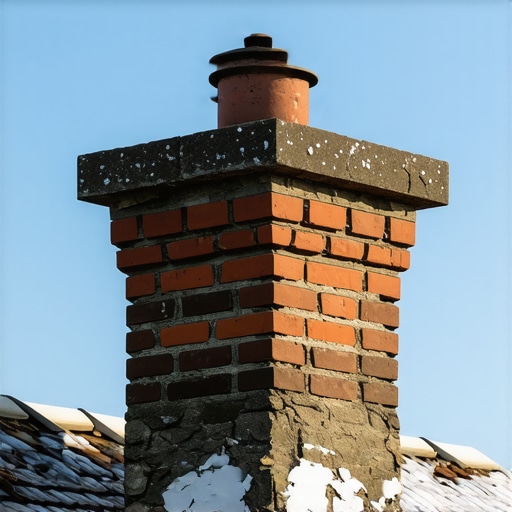
I stood on a roof last November looking at a massive historic chimney. The homeowner thought they just needed a quick lick of caulking. But when I tapped my trowel against the concrete wash, a chunk the size of a dinner plate sloughed off, exposing rusted rebar that looked like burnt toast. It was a classic structural failure caused by the most destructive force in masonry: the freeze-thaw cycle. When water penetrates a porous concrete crown, it sits there. When the temperature drops below 32 degrees, that trapped water expands by roughly nine percent. This volume change exerts thousands of pounds of pressure per square inch from within the concrete matrix, blowing the material apart from the inside out.
“Water penetration is the single greatest threat to masonry durability.” – BIA Technical Note 7
A chimney crown is not just a cosmetic cap; it is the roof of your chimney system. It is designed to shed water away from the brickwork below. When the crown fails, water runs down into the internal structure of the chimney, rotting the mortar joints, rusting the damper, and cracking the flue liner. Let us dive into the material science of why this happens and how to prevent your chimney from becoming a pile of expensive rubble.
The Restoration Reality: Why Breathability and Proper Mix Design Matter
Most modern chimney crowns fail because they were built incorrectly from day one. Many builders use leftover brick mortar, known in the trade as “mud,” to form the crown. This is a fatal mistake. Mortar is designed to hold bricks together in a thin joint; it lacks the aggregate strength and density to withstand direct, pooling water. A proper crown must be cast from high-quality concrete, mixed with air-entraining agents that create billions of microscopic air bubbles. These tiny pockets act as relief valves, giving freezing water room to expand without fracturing the concrete matrix.
Tuckpointing vs. Repointing: Fixing the Downstream Damage
When a crown leaks, the damage quickly migrates downward into the chimney breast. This is where homeowners get confused by terminology. Many handymen will offer a cheap “tuckpointing” job. Tuckpointing is a decorative technique where a thin line of contrasting colored mortar is applied to make joints look perfectly straight. What you actually need is “repointing”—the physical process of grinding out the damaged, soft mortar to a depth of twice the joint width, preparing the “tooth” of the brick, and packing in new, compatible mortar. If you put a modern, high-strength Portland cement mortar into an old, soft brick chimney, the hard cement will destroy the face of the brick during the next freeze cycle. The mortar must always be softer than the brick it binds.
“Under no circumstances should a mortar be harder than the masonry units it binds, as this forces thermal and moisture movement stress into the units themselves, causing irreversible spalling.” – ASTM C270 Standard Specification for Mortar for Unit Masonry
The Anatomy of a Flue Failure
When moisture bypasses the crown, it also attacks the flue. Traditional clay flue liners crack under thermal shock when wet. A cracked flue is a major fire hazard, allowing carbon monoxide and heat to escape into the home’s framing. In these forensic situations, a complete chimney flue liner installation using stainless steel or cast-in-place masonry liners becomes non-negotiable. Without a solid crown, however, even a new liner is on borrowed time.
The Step-by-Step Restoration Process
To repair a damaged crown and protect your chimney from future freeze-thaw cycles, you must follow a strict, multi-step process that respects the physics of concrete curing.
Step 1: Surface Preparation and Demolition
First, we must remove all loose, spalled, and delaminated concrete. Using a hammer and a cold chisel, we chip away the failed material down to sound, solid masonry. We then use a wire brush to clean away all dust, moss, and carbon soot. The surface must have a rough profile to ensure a mechanical bond for the new material.
Step 2: Wetting the Substrate (Preventing “Flash Setting”)
Before applying any new concrete or mortar, we must thoroughly wet the existing brick and concrete. Because old masonry is highly porous, it possesses high “suction.” If you apply wet concrete directly to a dry brick chimney, the brick will instantly suck the water out of the mix. This causes the new material to “flash set” or burn, leaving it brittle, weak, and prone to immediate cracking. We wet the substrate until it reaches a state of saturated surface-dry (SSD).
Step 3: Forming and Pouring the Crown
We build a wooden form around the top of the chimney. The form must overhang the brickwork by at least two inches, creating a drip edge that forces water to drip off the edge rather than running down the face of the brick. We mix an air-entrained concrete and “butter” the top of the chimney, ensuring a minimum thickness of three inches at the thinnest point. We slope the crown upward toward the flue liners, creating a watershed. We finish the surface using a steel slicker tool to seal the pores of the concrete.
Step 4: Curing and Applying a Breathable Membrane
Concrete does not dry; it cures through a chemical hydration process that takes 28 days to reach full strength. We keep the new crown damp and covered for the first few days. Once fully cured, we apply a professional-grade, vapor-permeable elastomeric membrane. This coating acts like Gore-Tex: it prevents liquid water from entering the crown while allowing trapped moisture vapor to escape.
Beyond the Chimney: Signs of Broader Masonry Failure
If your chimney crown is failing, chances are other masonry elements on your property are also suffering from moisture and structural movement. Homeowners should look out for these related issues:
- Brick Lintel Failures: The steel angles over your windows and doors (lintels) rust when exposed to moisture. As the steel oxidizes, it expands up to ten times its original thickness, lifting the brickwork above it and causing stair-step cracking. This requires immediate brick lintel replacement to prevent a localized collapse.
- Retaining Wall Distress: Just as chimney crowns suffer from poor water management, retaining walls fail when hydrostatic pressure builds up behind them. If you notice tilting or bowing, you may need a failing retaining wall repair or a complete retaining wall block replacement using modern modular retaining walls designed with built-in drainage weep holes.
- Slab Cracking: Driveways, walkways, and patios are also subject to freeze-thaw damage. Utilizing professional concrete flatwork services that employ air-entrained mixes is the only way to prevent surface scaling and cracking.
Do It Once, or Do It Twice
In the masonry trade, there are no shortcuts. A cheap brush-on sealant over a cracked crown is a temporary bandage that will trap moisture and accelerate the destruction of your chimney. By understanding the physics of freeze-thaw action and using the proper materials, you can protect your home’s structural integrity and ensure your chimney stands strong for another century. If you suspect your chimney or foundation has structural issues, consider seeking an AI masonry assessment or hiring a forensic structural mason to evaluate the health of your home’s masonry.