
The Forensic Scene: When a Hairline Becomes a Hazard
I was standing on a steep pitch in a freezing drizzle last November, looking at what the homeowner described as a ‘minor cosmetic crack’ in their chimney. From the ground, it looked like a gray thread against the red clay. But when I put my forensic scope into the void, the reality was grim. The structural steel of the internal brick lintel was rusted to a ghost of its former self, and the mortar joints had completely lost their bond, turning into a gritty, sandy paste that I could scrape out with a thumbnail. This wasn’t just a maintenance issue; it was a structural failure waiting for the next heavy wind. That ‘minor crack’ was a symptom of a systemic collapse caused by decades of moisture ingress. Most people see a chimney as a static stack of bricks. I see it as a dynamic thermal engine that is constantly under attack from the inside out and the outside in.
The Physics of the Chimney: A Brutal Environment
A chimney is the only part of your home that is simultaneously subjected to extreme internal heat and external freezing temperatures. This creates a thermal gradient that would shred lesser materials. When you light a fire, the internal temperature of the flue can spike hundreds of degrees in minutes. This causes the masonry to expand. Meanwhile, the exterior wythe of brick is sitting in sub-zero temperatures. This differential movement is why high-performance mortar mixes are not just a luxury; they are a survival requirement. If the mortar is too hard, like modern Portland-heavy mixes used by amateurs, it won’t flex. Instead of the mortar compressing, the brick itself will crack. This is the ‘Sacrificial Principle’ of masonry: the mortar must always be slightly softer than the unit it holds together.
“Mortar is intended to be the sacrificial element of the wall, allowing for stress relief and moisture evaporation.” – BIA Technical Note 1
In freeze-thaw damage restoration, we focus on the physics of water expansion. When water enters a compromised mortar joint, it sits in the microscopic pores. As the temperature drops below 32 degrees Fahrenheit, that water undergoes a phase change, expanding by approximately 9% in volume. This exerts an internal pressure of several thousand pounds per square inch. Over a single winter, this cycle happens dozens of times. The result is ‘spalling’—where the face of the brick literally pops off because the internal pressure has nowhere to go. Proper tuckpointing stops this cycle by replacing the porous, failing ‘mud’ with a fresh, struck joint that sheds water before it can penetrate the core.
Tuckpointing vs. Repointing: The Master’s Methodology
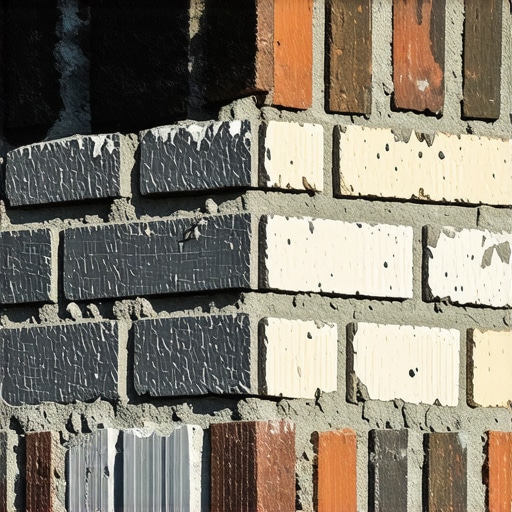
People use these terms interchangeably, but they aren’t the same. Repointing is the process of grinding out the old, decayed mortar to a depth of about 1 inch and ‘buttering’ in new mortar. Tuckpointing is a more aesthetic and technical refinement where you use two different colors of mortar to create the illusion of a perfectly thin, straight joint. It involves a base mortar that matches the brick color and a thin ‘fillet’ of contrasting color—usually white or cream—laid into a small groove in the center. This was a classic technique used to make inferior brick look like high-end ‘rubbed’ brick in the 18th and 19th centuries. Today, we use it for stone facade restoration and high-end chimney work to maintain the historic character while providing a modern moisture barrier.
[image_placeholder_1]
The Chemistry of ‘The Mud’: Why Modern Mortar Often Fails Old Chimneys
The biggest mistake I see ‘handyman specials’ make is using a bag of Type S Portland cement from a big-box store on a chimney built before 1940. Those old bricks were fired at lower temperatures; they are soft and porous. If you hit them with a hard, brittle mortar, you are signing their death warrant. We use sustainable masonry materials like hydraulic lime or Type N and O mixes for these jobs. These mixes have ‘autogenous healing’ properties. Because lime is slightly soluble in water, if a micro-crack develops, the water dissolves some of the free lime and redeposits it into the crack as it evaporates, effectively ‘self-healing’ the joint. This is why 100-year-old chimneys are often in better shape than 10-year-old ones that were repaired with the wrong materials.
The Advanced Tech: BIM and Forensics
In modern BIM masonry projects, we use Building Information Modeling to map out the thermal stresses on large-scale masonry structures. For a residential chimney, I use that same mindset. I’m looking at the ‘cold joints’ and the way the brick lintel replacement was handled during previous renovations. If the lintel—the steel or stone beam over the fireplace opening—is rusting, it expands (a phenomenon called ‘pack rust’), which lifts the entire chimney stack. No amount of tuckpointing will fix a chimney if the lintel is failing. We have to perform a surgical brick lintel replacement, often using advanced masonry adhesives to secure decorative elements while the structural work is being completed. This is the difference between a ‘Band-Aid’ and a cure.
The Hardscape Connection: Moisture and Drainage
Chimneys don’t live in a vacuum. Often, the moisture that is destroying the chimney is being wicked up from the ground or splashed back from a failing roof. I’ve seen failing retaining wall repair jobs where the hydrostatic pressure was pushing moisture into the foundation, which then traveled up the masonry through capillary action—a process we call ‘rising damp.’ If you’re building an outdoor kitchen masonry build, you have to consider how the chimney for the wood-fired oven will handle this same moisture. We use porous stone sealers that are ‘breathable’—they let water vapor out but won’t let liquid water in. If you use a non-breathable sealer, you’re just trapping the monster inside the wall.
“Water penetration is the single greatest threat to masonry durability.” – BIA Technical Note 7
The Execution: Grinding, Striking, and Curing
The process starts with the ‘Hawk’ and the ‘Slicker.’ We don’t just slap mud in. First, we grind out the joints to a depth of at least twice the width of the joint to ensure enough ‘tooth’ for the new mortar to grab. We use a vacuum-shrouded grinder to keep the dust down—because that dust isn’t just a mess; it’s silica, and it’ll kill your lungs. After the joint is cleaned and dampened to prevent the brick from sucking the moisture out of the mortar too fast (which ‘burns’ the mud and prevents proper hydration), we pack the new mortar in layers. We ‘strike’ the joint with a jointer tool to compact the surface. This compaction is critical; it creates a dense ‘skin’ on the mortar that is far more resistant to the freeze-thaw cycle than a loose, porous joint.
Conclusion: The Value of a Sound Stack
A chimney isn’t just a decorative feature; it’s a structural exhaust system. Ignoring the mortar joints is like ignoring the oil in your engine. By the time you see the smoke coming through the bricks in your attic, the damage is already five figures deep. Tuckpointing is the primary defense against the inevitable decay of time and weather. Do it once, do it right, and use the materials the brick demands. Otherwise, you’re just piling up rubble for the next generation to clean up.